Building a Forest Floor in Five Steps with the Esoteric Science of Throwingthingsonthegroundology
1. Pick your space
2. If the weeds, grass or shrubs are taller than a few inches, chop them to the ground
3. Water the area deeply to fill the ground with moisture
4. Lay down a double layer of cardboard or a thick layer of newspapers for weed block and soak it all with the hose
5. Stack a whole bunch of organic material on top of the weed block, then water again to soak everything
A forest floor is not covered in grass. Instead, it is a mix of decayed material, covered with still decaying material with regular new additions of leaves and twigs and fruit and other debris on top. The whole forest floor is like a compost pile. It doesn’t get tilled and it replenishes itself over time as material falls from the trees. Yet a forest may only drop a few inches of material in a year and takes its time to build up the soil layers. We don’t have to wait that long when we gather lots and lots of stuff and dump it on the ground all at once to start our forest. This gets things kicking FAST!
Annual gardeners have used this method of stacking up organic matter in their vegetable gardens. Most of us are familiar with Ruth Stout (Gardening Without Work), Patricia Lanza (Lasagna Gardening) and Paul Gautschi (of the Back to Eden film) and their deep mulch gardening methods. Personally, I find that deep mulching annual garden beds in Florida is a huge amount of work and hard to maintain due to how fast our soil eats organic matter – yet I find it very, very useful in perennial systems. Bare soil around trees and shrubs is hard on them, especially when the soil is just sand. Trees like to have a nice, cool, forest floor environment around their roots and that’s what we’re creating right at the beginning. Since we don’t have a forest already, we literally build it from the ground up.
Wetting the ground at the beginning is important. If you mulch on top of dry soil water can hardly get through to the tree roots. It takes a long, long time to get that sand wet under the mulch. But if you soak the ground at the beginning, then mulch over the top, the moisture stays in the sand beneath and helps the mulch above rot down into soil.
Covering up the existing weeds and grass with cardboard or another weed block starves them of light, making them rot down into the soil, creating humus while attracting worms and a host of other beneficial organisms.
We wet the cardboard after laying it down to make it stay in place and to make it easier for subsequent rains to soak through. If you do not have cardboard or are worried about potential contaminants in it or in newspapers, no worries. Banana leaves, palm fronds, heliconia leaves, or other big leaves act as a decent weed block. Just put a lot of them down as they aren’t as thick or long-lasting as cardboard.
After you have your weed block layer in place, chuck a bunch of biomass on top of it. We’re talking logs and prunings and grass clippings and raked leaves. You can also throw some seaweed down if you live near the beach. That adds extra nutrients to the system. If you have compost, throw some of that there too. Anything that adds nutrients and feeds the plants is great. Feel free to throw in paper plates, coffee grounds, shredded paper and kitchen scraps to your pile of yard waste. If it looks too ugly, smash it all down and throw some nice, purchased mulch over the top. I got away with some really ugly sheet composting that way. No one even knew there were chicken bones and rotten potatoes hiding under there but they fed the trees quite nicely.
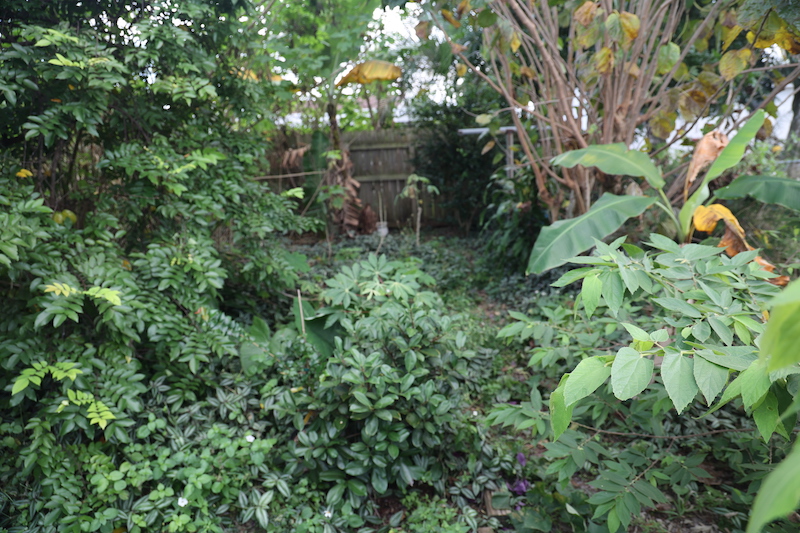
A few months after the big yard waste drop, I came back to check on the food forest. The yard waste mountain had already shrunk quite a bit, settling onto the ground, browning and rotting.
I dug around beneath it and found something I had rarely saw in that backyard when I was a kid. Life!
Worms and beetles and millipedes. There was a lot of tiny life beneath that pile of rotting material, and not only that, a forest floor was starting to develop.
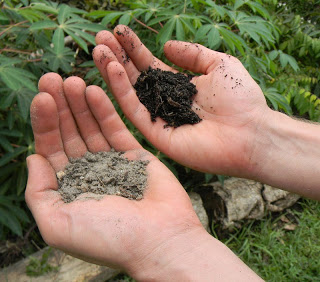
I pulled up a good handful of crumbly, black, sandy humus. It looked nothing like the soil we started with, except for the grains of sand mixed into it. It smelled alive, like fresh mushrooms, and was the best soil I had ever seen in that yard.

“Welcome back,” the neighbor said from behind the fence.
“Good to see you,” I said. “Look at this!”
I brought a good handful of new soil to the fence. “See? This came from all the yard waste we dropped.”
He looked at my handful of black, living humusy soil.
“Well,” he said after a moment. “I never saw this before.” He looked closer and shook his head. “I learned something new today.”
I know how he felt. It seems like magic to me as well. The first time I sheet mulched on top of rocky clay soil in Tennessee, the resulting rich loam a year later was a wonderful surprise. In Florida, the breakdown process happens much faster.
You can turn Florida sand into good stuff. It’s not easy, and it doesn’t last if you don’t renew it regularly, but if you create a food forest with lots of mulch at the beginning, then grow plants you can keep dropping to the ground to build the forest floor, you can indeed turn sugar sand into good, healthy ground.
At the beginning of your Florida food forest, an easy option is to start with a load of mulching material from outside, then start producing your own mulch right in your food forest.
Producing your own mulch? Like – with a chipper?
No – no need for a chipper. Just grow various plants that you can chop into pieces and throw on the ground. Many plants can be cut again and again to serve as mulch, and they’ll keep coming back. When I was a kid there was an Albizia lebbeck tree that kept growing in the hedge just on the neighbor’s side of the fence. My dad cut that thing down again and again, trying to get rid of it – and it kept coming back. I know now that the tree was a nitrogen-fixing, fast-growing pioneer species that would have been great as a chop-and-drop tree for a food forest, but back then we just thought it was a pain in the neck. There’s a good chance that right now you have something growing in your yard that is similar. Instead of trying to kill it, why not turn it into a compost factory? Cut the top off, throw it around a tree you want to feed, then let it grow back again. When it grows back good and strong, cut it again.
And plant more trees like it! More biomass = more potential humus.
Excerpt from Create Your Own Florida Food Forest, Revised, Expanded and Illustrated 2nd Edition


6 comments
Have been doing something similar in my small garden. When I’m around town I keep an eye out for yard waste bags. I don’t take grass clippings because TruGreen has a presence here, but in the spring/early summer, a lot of those bags are full of oak and magnolia leaves because the grass isn’t really growing yet. I throw them in the truck and take them home to the garden. It’s been less than six months, at least a dozen huge bags of leaves (and when the bags are paper, they become the bottom layer) in a fairly small space, and already I’m running out of mulch to cover the soil with. Wouldn’t have thought magnolia leaves could decompose that fast! All over, I’ve got 2-3 inches of nice fluffy black soil like you describe, right next to the original sand. At the start, I could put a shovel in the ground, turn over a clod, and not find any living thing apart from a few grass roots. Now it’s crawling with worms, crickets, roly-polies, and other creeping things. I’m really bummed that nobody’s raking their yards this time of year. I need more!
The only downside so far has been 2 of those bags having a fair amount of trash in them– little bits of plastic, metal, and wire mixed in with the leaves, that I have then had to pick out and throw away, as it turns up in the garden. Overall, not a huge deal. Plants are happy.
Meantime, just picked my first 8 pumpkins of the year :)
Like Aunteater, I use local yard waste for sheet composting and mulch. Yes, plastic and other foreign matter is an issue that has to be handled when using yard waste. You can remove some of the foreign matter when spreading the material after collection, but you won’t get it all and will be picking out small pieces over time.
Regarding cardboard layers, they are fine if the area where applied is not near a fruit tree, I don’t use it near existing trees as during the dry season, it can divert water away from trees. (In fact, I use only shredded cardboard, which is less problematic in the dry season.)
On a related note, heavy mulch can absorb water during the dry season and penetrating it to apply water, takes effort and a lot of water. I get around this by applying water to small areas under the tree where I apply a lot of water to penetrate the mulch. Light watering of deep mulch – the mulch will absorb the water; very little will get to the roots. Despite this issue, deep much is very good once you get it established.
I did worry about the watering issue, initially– particularly because, for incomprehensible reasons, our current rental doesn’t have an outside spigot. So if things need watering, I can’t just take a hose out there and soak it. I have to fill buckets in the frigging bathtub and haul them out to the garden :/ For the small front bed and potted plants, I have a painfully inefficient stopgap where I put a catch-bucket underneath the HVAC drip, and then water the nearby plants with it.
Anyway, it turned out not to be a problem in the main garden, for a few reasons: 1) the mulch starts out 6-8 inches thick, but decomposes so rapidly that it’s really only a short time that it’s even capable of keeping water from penetrating all the way into the soil. 2) Since I can’t get out and water with a hose anyway, the MOST important thing is conserving the moisture in the soil, and keeping the soil temperature down, to minimize the amount of water that gets lost *from* the soil. 3) When I *do* have to water things, I haul buckets out there, and I don’t try to be like a sprinkler and get everything damp. I dump the whole 2-3 gallons right under the plant that needs watering, so it’s guaranteed to get through (rinse, repeat). 4) We live close enough to the coast that we hardly ever get any light rains. If it rains at all, it’s a deluge. And this time of year that can happen nearly every day.
Anyway, the top problem remains finding enough carbon mass to keep the mulch layer thick, so that the ground doesn’t heat up. In the absence of free curbside leaf-bags, I’m constantly pulling suckers off the trees and cutting weeds to supply the garden, but it’s never enough to keep up. The soil is a ravenous, insatiable beast. And just like spinach in a frying pan, all that green stuff looks big when you cut it, but then it cooks down to almost nothing.
I’m going to come clean. It feels like a recovery meeting admission of guilt.
I do not like composting. It’s a lot of work for little reward. We have 4000 square feet of 4 ft wide garden beds. Thats too much for compost. I burn tomato and curbit plants to kill pests and disease. I have lit compost piles afire to add some ashes. I like fire and I’m lazy. I don’t even turn them. It’s a discipline for the kids.
That is funny. I just throw organic matter on my garden beds or by fruit trees when I’m not feeling like making compost.
I also like fire, but I save it for the stick piles.
I took note of your ideas and the principles, and by accident a month later I find a quote by Ralph Waldo Emerson:
“What is a weed? A plant whose virtues have not yet been discovered.”
Isn’t that a nice way to put how pests can become mulch :)
Comments are closed.